
With modern transportation, traffic lights are a vital part of road infrastructure and affect people as they travel throughout their day. Therefore, it is crucial that traffic lights continue to work as they should and that professionals fix them when they break.
But how do you build the required circuit for a traffic light? What do you need for traffic light electronics?
This blog explores how to create a traffic light system and the components you need to do so.
What Are The Components In A Traffic Light Circuit?
LEDs
The LEDs provide the colours for drivers to observe and use, meaning you will need green, amber and red LEDs. Some amber LEDs emit a light that appears red; a yellow LED may be more effective.
Resistors
One of the smallest components available, you can identify a resistor with an ‘R’ on the component, followed by a number. When building a circuit, the number on the resistor should match the number on the PCB. For example, you should use an R1 resistor if and where the PCB says R1.
Transistors
This component has three pins, and it has the letter ‘Q’ followed by a number engraved in it. They are available in various sizes and shapes.
Be careful when soldering transistors as they are heat-sensitive.
Capacitors
Two types of capacitors are available: ceramic capacitors and electrolytic capacitors. Electrolytic capacitors are polarised, and the positive leg is usually longer than the negative leg, though they can be the same length.
Ceramic capacitors are easier to solder. When adding this component to the PCB and the ceramic capacitor, there should be a few millimetres between the PCB and the capacitor.
Diodes
Diodes are polarised, meaning they will not operate if inserted the wrong way. They also have a band near the negative pin (the cathode). You can identify a diode by the ‘D’ found on the component, though be aware that LEDs commonly have this symbol too.
Power supply
A circuit requires power, and a traffic light circuit is no different. You can find this device in a traffic light’s control cabinet, and it should follow the requirements of the local utility company.
Circuit board
The traffic light PCB will hold all the components for the finished circuit. A PCB is a circuit board with no components soldered on. When the circuit is complete on the board, it becomes a PCBA.
Wiring and connectors
Wires can connect a circuit to output signals, input signals and power. Wire colouring can help identify their purpose, though it is not a requirement. For example, you should connect the circuit to power with red and black wires.
Housing
Also called insulators, the housing protects the circuit board and its electrical components from external factors. It is usually made from plastic.
Micro controller/Integrated circuit
ICs, such as regulators, are sensitive to heat and static electricity, so it is easier to include them in a circuit when you solder IC sockets to the circuit board first. These sockets are a pair of connector rows.
You should only add ICs to their sockets once the circuit is complete.
How To Make A Traffic Light Circuit

After establishing the different components required for this task, the next section of this blog explores assembling traffic lights and their circuits.
1) Gather required components
Acquire the components listed above. Each piece may have variations, such as the type of resistor, though you can usually determine which one you need via the PCB.
2) Design circuit board layout
In this design, incorporate the relevant components to form a complete circuit. There should be two ICs, one that controls the three LEDs and one that acts as a timer.
The IC acting as a timer sends a signal to the IC controlling the LEDs, which causes the lights to change. This traffic light effect requires a combination of diodes as they allow the lights to switch on time.
You may also add additional LEDs to show if power and signals are present in the circuit, though these LEDs are not the three that illustrate the traffic light system.
Depending on how you order your PCBs, you may be able to upload your Gerber files to show your design. You can then order your PCBs and assemble the circuit once they arrive.
Always follow the manufacturer’s instructions when ordering PCBs to ensure you get the desired product.
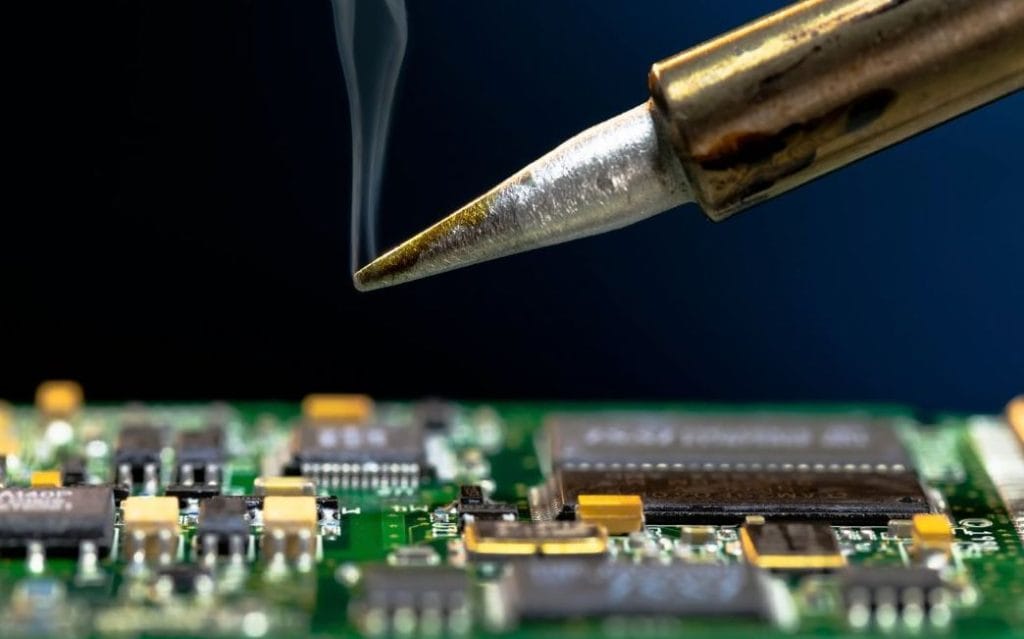
3) Solder the resistors and capacitors
Ensure due care and attention are applied to prevent damage to the components and PCB. This damage can occur through heat from the soldering process.
4) Connect LEDs
You should incorporate the green, amber (or yellow) and red LEDs into the circuit at this stage. As LEDs are polarised, ensure you order and insert them correctly so they can work.
5) Place and solder transistors and diodes in their locations
Avoid damaging the transistors and diodes when soldering, and make sure you place both components correctly. If you insert them the wrong way, they will not function correctly, if at all.
6) Ensure you have avoided solder bridges between components
A solder bridge is when you apply too much solder, connecting at least two pads on a PCB. They can lead to malfunctions and a short circuit, to name a few.
No method can guarantee no solder bridges, but you can take precautions to minimise the risk.
7) Apply a suitable power supply
The traffic light circuit needs an appropriate power supply to function as it should. LED drivers provide a relevant current and voltage for the LEDs by converting them from the electric current from a traffic control device.
8) Test each LED separately by applying power
This step allows you to identify any flaws in the circuit. If an LED isn’t working correctly, there could be a fault with the circuit or the LED itself that needs amending before the traffic light system can function correctly.
9) Ensure the timing sequence is accurate
Whilst some traffic lights use sensors to change colour, others use a timer. This method means traffic can flow no matter the time, day or night. Smaller vehicles like motorbikes don’t have to worry about sensors not registering their presence.
After building your circuit, ensure appropriate timings with light changes to maximise safe traffic flow and management in an area.
10) Place in circuit housing
Place the completed circuit in circuit housing to protect it and its components from external elements. Various methods of mounting circuits in circuit housing exist, keeping the PCB in the correct position.
Troubleshooting Your Traffic Light Circuit
Building a traffic light system through PCB assembly requires meticulous execution. To ensure success, create a list of materials and gather the necessary components for the project. Place the components accurately onto the circuit board. Then, test the circuit for any potential issues.
After this point, incorporate the coding or programming to enhance functionality. Depending on the package, C/assembly language might be employed. Use a code similar to the one below to control the traffic light sequence. It is recommended you use the correct code for your specific components.
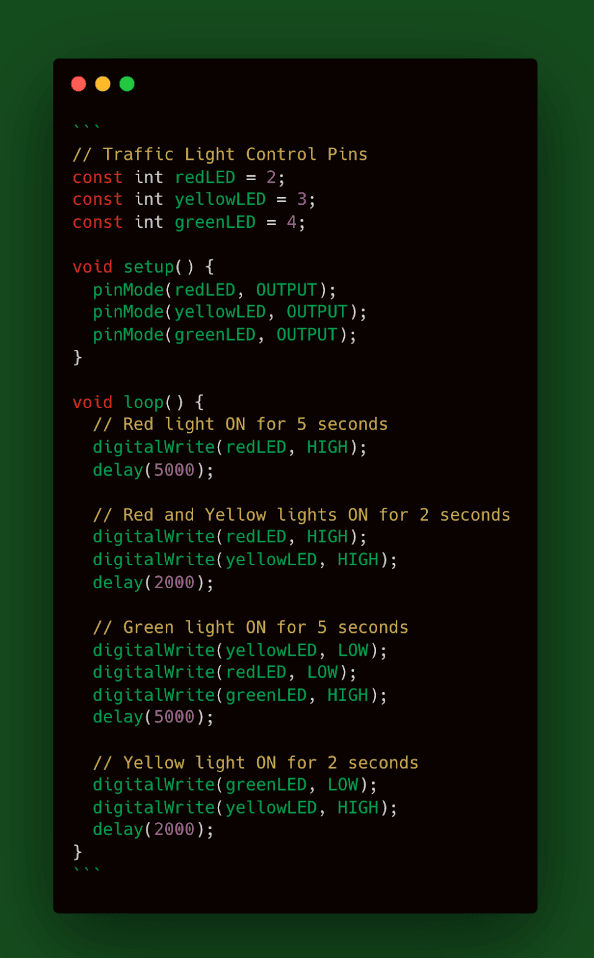
After uploading the code, observe the LEDs illuminate in the designated pattern: Red -> Red + Yellow -> Green -> Yellow. Customise the time intervals to your preference. To finalise the process, connect the PCB assembly to your computer, compile the code and upload it to the board.
Case Study: TWM Traffic Control Systems
Altimex have supplied TWM Traffic Control Systems Ltd. with various product solutions uniquely tailored to their needs. We have provided high-quality, cutting-edge solutions, from safety-critical equipment complying with IEC61508 requirements to flashing controllers.
TWM Traffic Control Systems have given Altimex constant accolades for our dedication, dependability and honesty.
Here at Altimex, we have various services available to support you with your PCB assembly needs. Our experts can accommodate most surface-mount and through-hole component combinations, giving you the support you need and peace of mind.
See how we can support your electrical needs today!